Wednesday, May 25, 2011

Chicken Scratch

It has been a while since I updated you on the lives of our chickens! So much for my plan of writing a weekly post! But all is well in our little chicken family....I thought today would be a great day to show off our coop and my beautiful ladies! 

(The awesome coop my hubby built for me) 


We purchased our feeder and waterer, and I am so pleased with both of them. We hung the feeder from a wire from the ceiling, which keeps the chickens from scratching shavings into it and also keeps pest from getting in. The waterer is sat up on bricks so that the chickens cannot get shavings in it, they still get a few in but not nearly as many. I am so pleased with our new feeder and waterer. These little missies where so messy before and now they are trouble free. I like that. Alot. 

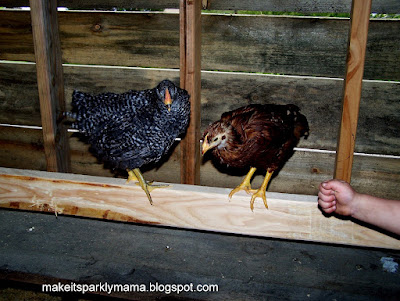
(this one is my favorite) 


(I set them on their roost board every day so they get the idea)

(the little group) 

(got cheek feathers?~she does! )

(my favorite part of this photo is the little grubby fist reaching in)

(little Mr. is sad because they just aren't as easy to hold as they used to be)

We have had one tragedy, one little chickie was more athletic than the rest and would routinely hop out of her box (which was in the bathroom) without problems, I never would have dreamed she might accidentally hop out of her box, into the toilet, and drown! Oh my goodness, the sadness! I felt like such a bad chickie Mommy! 

We still need to name our little girls, now that they are looking very different from one another I think the middle mister and I will need to get on that! 

Monday, May 16, 2011

Holidays for Everyday: May 17 - 23, 2011

Tuesday, May 17th, 2011 ~ Pack Rat Day

Pack Rats unite, Brandon my son, this means YOU! Perhaps this would be a good day to do a little decluttering, or on the other hand give yourself a day of from decluttering. Maybe I will walk past Brandon's room and not sigh all day. If on the other hand you aren't wishing to embrace your pack rat self any longer you could always visit, www.flylady.org 

On the other hand you could go to Nick Jr. and play a little game of PakRat. Its fun....don't ask me how I know.

Wednesday, May 18th, 2011 ~ Mt. St. Helens Errupted 

This is probably most relevant for those of us living in the Northwest, because this was a pretty signifiant even that happened around here. This appears to be a great resource for kids (and adults alike). http://www.kidscosmos.org/kid-stuff/kids-volcanoes-st-helens.html

Thursday, May 19th, 2011 ~ Circus Day

Personally, I think this clown craft is pretty stinkin' cute. It doesn't hurt that after they make this craft they can use it as a interactive toy. 


Go Here for the template and instructions! 


Friday, May 20th, 2011 ~ Pick Strawberries Day

Strawberries aren't even close to ready to be picked around here but I thought I would include it anyways. Just so I could share this link from one of my favorite new blogs, (new as in, new to me) 


Saturday, May 21st, 2011 ~ Armed Forces Day

This is simply a day to salute sharply to all of the men and women in all branches of the service who protect our country and you. They can be called upon at a moment's notice to perform a risky and perilous mission for freedom and country. They train diligently both physically and mentally so they will be prepared to prevail in any mission they face.
Just how did it all begin? Well, each branch of the military had their own day of celebration. But, on August 31, 1949 then Secretary of Defense Louis Johnson announced the creation of Armed Forces Day. President Harry Truman also announced the holiday in a presidential proclamation on February 20, 1950. All branches of the military were asked to celebrate on this day and they complied on the first Armed Forces Day which was held the following year on May 20, 1950.  ~ Information from HolidayInsights.com

Sunday, May 22nd, 2011 ~ Buy-Musical-Instrument Day

Personally I am not planning on buying any musical instruments anytime soon but.........remember these guys Maracas for Cinco de Mayo ? Now would be a good time to make them if you didn't on Cinco de Mayo! 


Monday, May 23rd, 2011 - Lucky Penny Day


Holy Moly ~ anyone up for making a necklace? Actually I see potential in this idea!


Cute idea for a card.....especially if your Dad happens to be a penny pincher! LOL 


Lucky Penny
This little doll could just as easily say~ I hope your day is Lucky! or Happy Lucky Penny Day! or I am so Lucky to have you! 

~~~~~As always have fun celebrating the fun and wacky, little known holidays~~~~~

Sunday, May 15, 2011

Gifts for Grads Linky Party

Have you seen the party going on over there on my sidebar? Well technically it isn't a party yet...but as soon as you link up your projects it will be! I will be back later today to link up a fun graduation gift holder but go ahead and get this party started!

Heres your invite: (I wish I had some gold lettering right now)

Please link up your Graduation  ideas, this could be gifts, cards, decorations, ect. 


You can link up your etsy shop directly to a graduation gift idea but only if you link up one from your blog first. And only one etsy link up per shop please! 


Since this is my first linky party would you please help me spread the word....its ok, if you don't, I still want you here. But I would be thrilled if you did! (you can find the code to my cute button over in my sidebar)


This party will be going on all week so be sure and check back! 


Thank You!!!! 

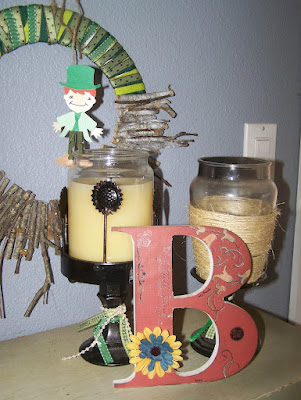
Twig Wreath from my Dreaming of Summer Display

This is probably one of the most versatile crafts I have ever done. This wreath was first made in January when I needed a little something to decorate with. I traced two different circles on cardboard and then cut out the wreath shape. Then I started glueing on pieces of branches that I cut up. But as life goes I never finished it. When St. Patrick's Day rolled around I decided to add some ribbon instead of more twigs to finish it up. I loved the way it turned out! I just used scotch tape to tape the ribbon on the back. That way it is an easy fix when I go to change it up! 


Then I changed the ribbon for Easter~totally a quick and easy way to change the look! 


After Easter I started putting together my summer display and used a tan ribbon and a ribbon that says "treasured moments" on it. After I took off the Easter colored ribbons and before I put on the summery colored ribbons I spray painted the twigs white! 

I hung it up and then hung the coffee filter flower on top of it! 


Soooooo gorgeous~ I just love it! 

Saturday, May 14, 2011

Sand Footprints from my Dreaming of Summer Display

So far this month Dreaming of Summer has been my most popular post! This little display is still making me smile every time I see it, and that's a lot! The last post only showed the end results so this time around I thought I would show you some of the behind~the~scenes action that took place to make my pretty little space!

First of all lets talk about those footprints in the sand. I was laying in the sun on a blanket watching Mike play in the sandbox. A warm wind was blowing and it was just warm enough for me to start dreaming about summer. At first I wanted to make a set of each boys footprints...well the younger two anyways....I don't think man size footprints from Stefan would have been so cute....anyways......after the hassle that was this project I ended up with one footprint from each boy that was in the same frame! And I admit....I really love it that way.


 First things first. To make your frame I glued 3 dollar store picture frames together. Remove the glass and the cardboard. I used my gluegun to glue the 3 frames together. However I think a glue like Gorilla glue would have worked better. I put the cardboard in the back frame which was my first mistake. If you are doing this project I would use something like a piece of lightweight plywood or foamboard would probably work to.


If you buy your frames at the dollar store, make sure your frames lay flat before you buy them, some of them are twisted and will not lay together nicely. After you glue the outsides together, using your hot glue gun use the glue to caulk any spots that aren't a tight fit. Do this on the inside of your frame.

Then I spraypainted my frames wit h a couple light coats of white paint. I want that beachy look so I did not try for full coverage.

My first idea was to use plaster of paris mixed with sand! NO NO NO! Don't do it! I tried this twice and both times I missed the small opportunity to get the footprints when the stuff was the right consistency! I was frustrated covered in plaster and Michael was having a meltdown. The floor, the porch, the kitchen counters all covered in plaster. Ugh!

So I did the only sensible thing. I changed our clothes, got lunch to go, and went to the park, where he played, and ran and then we went and through rocks in the river. It was a nice afternoon!

Unfortunately, the mess was waiting for me when I got back. This time I used Tile Grout with no sand mixed in. It took a lot of stirring but we had ample time to get the footprints, even smooth out and try again if needed. I did Brandon's footprint first since it was the largest and then Michaels. So here is my recommendations. Put your phone on silent, have a helper, lay the frame on something plastic or a drop cloth for easy clean up, have lots of clean rags ready to go, dry and wet, use tile grout, and have lots of patience! 


After the footprints were dry, and that took a while, since there were 3 layers of stuff in there, I used furniture polish to add accents to the footprints. I still need to find a way to add the date on there but overall I am pleased as punch with my footprints.

Wednesday, May 11, 2011

Blended Coffee from YOUR blender!

Some mornings I need a little kick of caffeine!Wednesday mornings usually and Monday mornings sometimes...and any morning where the kids kept me up all night! I am not one to buy a coffee unless it is a special treat so I "invented" this recipe. It is yummy, diet friendly and best of all, you can add as much caffeine as you like!


Ingredients:

1 Cup Milk - I use fat free or 1%
6-8 Icecubes
2 TBL. Cocoa
2 TBL. Instant Coffee Crystals
3 packets of Equal or Sweet~N~Low
2 TBL Peanut Butter

Any of these can be adjusted, I usually leave out the peanut butter altogether.

Blend and in no time at all you have this!


And that my friends is a VERY good way to start the day! 

Monday, May 9, 2011

Make It Yourself Miche Bag Cover


A couple of years ago my sister-in-law gave me a Miche Bag for Christmas. I loved the idea of it until I realized that the covers cost more than most of the purses I buy. Soon after I started dreaming of making my own covers. I googled the idea and saw that other people had in fact made their own covers.

I have two different ways to make these. The first I am sharing with you is the NO SEW method. Quick, and easy! Wham Bam, finished method!

You will need:

An original Miche bag cover to use as your pattern
Fabric of your choice
3 cereal boxes or other cardboard
Fabric Glue
Hot Glue Gun and Gluesticks
SUPER DUPER strong magnets


Step 1: Lay your original cover on top of the wrong side of you fabric and trace.

Step 2: Cut around your trace lines leaving 1.5" extra all around. Yes you can measure this but I didn't, I just eyeballed it!


Step 3: Lay your original cover on your cardboard and trace the stiff parts. I doubled the thickness of the cardboard so I did 4 pieces that looked like this....and two pieces for the bottom of the purse.

Step 4: Cut out all your cardboard pieces and if you are doubling the thickness glue them together.

Step 5: Lay your cardboard pieces on the wrong side of the fabric and using your hot glue gun, glue the extra fabric to your cardboard. Be sure to make your corners look nice.

Step 6: Measure carefully and glue your SUPER DUPER strong magnets on to your cover.

Step 7: Wrap cover around purse and ENJOY!


I will be sharing the sewn version later this week. If you have any questions just leave them in the comments and I will answer!

I was featured at *born-again crafter*!


I was featured, and let me tell you it made me do a little happy dance! 

Come Visit me at While He Was Napping!

Today I am guest blogging over at While He Was Napping! 


She has an awesome blog with a ton of followers who think she is great! 
After all 1100 people can't be wrong! 

Oh and did I mention a little thing called a GIVEAWAY! 

You have to go OVER there to check it out! It is for a $20 gift certificate to my Etsy shop, 
Sparkly Mama Made It! And I know you ALL totally want to win! 


Holidays for Everyday: May 10th - May 16th

The holidays featured this week are a little bit lame! There simply isn't much to pick from, after all I don't make up the holidays I just feature them! The 13th -15th are pretty interesting so scroll down and be sure to read about those! 


Tuesday May 10th  -Clean Up Your Room Day

Boy do I know a couple of little boys who will be participating in this! 

Wednesday May 11th - School Nurses Day

The school my son goes to does not have a school nurse, at least not that I know of!But for those of you who do, show a little love! 

Thursday May 12th - Kite Day

Will you fly a kite with your kids at the park, search online for a virtual kite flying game or simply tell someone to go fly a kite? Whatever you do, enjoy! 

Friday May 13th - The ONLY Friday the 13th in 2011


Why is Friday the 13th so UNLUCKY? 


According to www.holidayinsights.com


In biblical references, it is believed that Cain killed Abel on Friday the 13th. We are not sure how this was determined, as calendars were unlikely to have been in existence back then.
We do know with certainty, the ancient Babylonian Code of Hammurah omitted the #13 in it's list of laws. Written in 1,700 B.C., it sggests ancient Bablylonians considered the #13 to be unlucky. 


Saturday May 14th - Dance Like A Chicken Day

What say you? You don't know how to dance like a chicken? Good thing I found instructions! 
  1. Anyone who's not chicken, stand in a circle facing each other.
  2. When the music starts, hold your hands out in front of you and open and close them like a chicken beak four times.
  3. Put your thumbs in your armpits and flap your wings four times.
  4. Place your arms and hands like the tail feathers of a chicken and wiggle down to the floor four times.
  5. Clap four times.
  6. Repeat steps 1-5 four times.
  7. After the fourth time take the hands of the people on either side of you and everyone move in a circle.
  8. When you get dizzy, switch directions.
  9. Repeat until the end of the music or until you fall on the floor. 

Sunday May 15th - National Police Officer Memorial Day

Ways to participate in this day:
  • Say thanks to local police officers.
  • Make a donation to your police department.
  • Participate in activities honoring officers who have died on duty.
  • Make a card, bake cookies, write a letter to the editor showing police officers you are thankful for them.

Monday May 16th - Sea Monkey Day

I have always wanted to have Sea Monkeys! Yes I know, a weird thing for a 30 year old to want. Nevertheless I do! This year might just be the year I get some! 


Sunday, May 8, 2011

Happy Mothers Day!

HAPPY MOTHERS DAY!!!!! 

I hope every mother and every woman who isn't a mother but still touches other peoples lives (every woman), has a Mothers Day that is full of smiles! Full of fun! Full of the people who they love! And I hope that you get a little spoiled on this day and are shown appreciation and love! 

Thank you for reading my blog. I absolutely feel like being a mother is my calling from God and I love to pass on some of  the things we do. 

My family = My joy! 

(Photo taken by my lovely Mama) 


As I was reflecting on Mothers Day I can't help but feel extremely blessed. My mother is an angel, a saint, my hero and my bestfriend! She loves our family with her whole heart! She puts her job as Mother, Nana, Mother-in-law above everything else! She is a great example of motherhood and she sets the bar high for her two daughters to follow. 

(Photo taken by Brandon, I am sorry Mom I know this photo
is not one you would have picked out but trust me when I say it
was the best of the two of us) 

I love you Mom! 

And to show my LOVE I decided to get a little tattoo to prove it! 

(and now before you have a heart attack, please know that 
this is just an effect that is in Piknik, the photo program I now use!!!) 

And I need to share this story because it is super funny! I absolutely LOVE this dress, I got it yesterday for a date I went on last night with my hubby! Mom and I shopped and shopped . Today I wore it to church and was feeling sooooo girly! I went to grab up Michael my toddler to change his diaper and somehow the diaper came off and POOP got smeared all over my dress! What a mess! My mom was there and we had such a laugh over the joys of motherhood! 

This will be my last Mothers Day with a baby in diapers and I just couldn't help but laugh! 

Bonus! - photo of me before my date with the hubby! We went out for drinks to celebrate one of my best girlfriends birthdays! 


Saturday, May 7, 2011

Last Minute Mothers Day Gift!

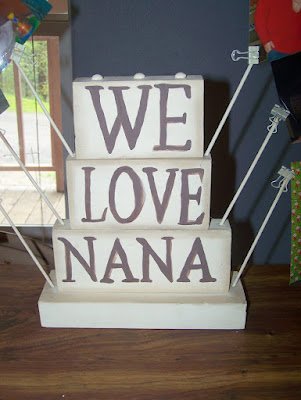
I gave my Mom this gift last year for her birthday. It was really quick to put together and she loves it! (so she says...you never know if you can trust a Mom to be honest with her children, lol)

I thought maybe someone out there was needing a quick Mothers Day Gift!


Here are the instructions:

Cut a 2x4 into sections.

Paint the base color.

Stencil, freehand, use vinyl, for the lettering........so many options, all of them easy!


Lay the first board flat and then stack the boards with the writing on them and screw together using long screws. One section at a time. (So you would screw love to we, and then Nana to we, and then the bottom board to Nana)

Drill holes in the sides to insert your dowels - OR simply glue clothespins on the back. I would go with the clothespins route the next time.


Give to Mom (or Grandma) and let her insert cute pictures of her favorite kids!

Friday, May 6, 2011

Dreaming of Summer!

I have been wanting to incorporate more white, and light into my home. I have dark wood floors, dark furniture, dark curtains, and I am ready to shake off the heaviness of winter and let the sunshine pour onto my soul. So when I heard that Songbird was having a WHITE party, well, lets just say that that was all the nudge I needed! I pulled things from all over my house and yard to add to my white collection. I stole borrowed! a few things from my Mom. I did do a little spray painting and a little crafting, but it didn't cost me a dime. I love the concept of shopping your home to find the stuff you need. A little tip I learned from reading blogs!


Anyways, I think the pictures speak for themselves mostly. I will have a rundown of tips for the sand footprints, the wine bottle, the wreath, the shadow box, and the pitcher later in the week. I had a soooo much fun doing this project! And I can't help but feel sunny and warm, and RELAXED when I see it!

Thursday, May 5, 2011

Maracas for Cinco De Mayo!

Remember when I posted that Cinco de Mayo was this week and I WAS SURE that I would think of something! Well guess what? I did! These fun little Maracas are simple, fun, easy, and MUCH SAFER than making them out of burnt out lightbulbs like I did when I was a kid!


********************************************************************************

You will need:

Handles - I used a paint stick chopped in half, I already had them left over from a different craft. They worked great. A dowel would also work as would a tp roll. Ohhhhh a tp roll would actually work great!

Paint - Totally optional but it makes them cuter! 

Plastic Easter Eggs - Procrastinators rejoice! Like me! Just grab a couple out of your half packed tote full of Easter crap decorations!

Rice and Beans - No I am not making a pun about the food we eat on Cinco de Mayo! You need uncooked rice and uncooked beans! I used about 2 Tablespoons of each.

Tape

Glue Gun and Glue

Tissue Paper

White Glue and Water

Ribbon or Yarn

*********************************************************************************

Step 1: Paint your handles

Step 2: Fill your eggs with rice and beans, after doing a little experimenting and bothering my husband by shaking them in his ear, I decided that I liked the sound of filling one egg with the rice and one egg with the beans.

Step 3: Tape the egg shut and fill those little air holes by dabbing with hotglue

Step 4: Glue the eggs to the handles

Step 5: Mix your white glue with water, you will want a consistency just a little thicker than milk

Step 6: Cut your tissue paper into squares mine were about 8" by 8"

Step 7: Dip your egg into the glue/water mixture and cover with tissue paper. I did 2 sheets of tissue paper at a time, and repeated 3 times. That is 6 pieces of tissue paper.

Step 8: Gather the extra tissue paper around the handle and tie on some festive ribbon. (Totally optional but makes them more fun)

Step 9: Shake shake shake, shake shake your booty....errr..... your Maracas! And annoy your hubby some more!


Disclaimer - I totally planned this activity for my kids but I enjoyed it every bit as much as they did if not more!

Tuesday, May 3, 2011

Chalkboard Hand Sanitizer Containers


This idea came to me shortly after posting that I didn't have any ideas for Teacher Apreciation Day. It is sort of a combination between the hand sanitizer I posted about yesterday and my chalkboard soap dispenser I made last year. Honestly, the chalkboard sticker that I used combined with the water that gets splashed all over my bathroom and it wasn't long before my cute little soap dispenser was looking pretty sad. But there is no water involved in Hand Sanitizer and I did not use the chalkboard wallpaper so I am expecting these to hold up well!


Step 1: Empty hand sanitizer container, no need to rinse or anything since hand sanitizer will be going back in.

Step 2. Scrub off the label

Step 3. Spray paint with chalkboard paint, before I did this I was bummed that I only had green chalkboard paint and not black but I am sooooo thrilled with how they turned out! I painted these with about 4 coats letting dry for 20 minutes in between.

Step 4: Let dry for 24 hours (ok, so I let them dry for about 4 hours)

Step 5: Prime with chalk by rubbing it all over the container, then erase

Step 6: Write your message, tie a piece of chalk around the top, attach a tag that say "Hand Sanitizer" and you my friend are done!


(Message on the back)

                         (I espcecially loved this one that had square sides that I could write on)


Monday, May 2, 2011

Winners of the Stamp Giveaway....

Hip Hip Hooray! Today is a good day for..........


Miss Valerie who won Stamp Set #1

and

Miss Krista from While He was Napping who won Stamp Set #2

Holidays for Everyday: May 3rd - May 16th

Tuesday May 3rd  -National Teacher Appreciation Day

How in the world can Teacher Appreciation Day be tomorrow and I have nothing prepared? Well anyways, I have looked on my list of go-to blogs for some cute and quick ideas and listed them below!

Click here to learn how to make this homemade hand scrub from Christy at Glitter to Gumdrops

Or this idea looks super simple and easy as well! LOVE IT! From Little Birdie Secrets!

And of course, every teacher my child has ever had tells me the gift they love the most has been a handwritten letter of appreciation! They deserve our words of appreciation!

Wednesday May 4th - National Weather Observers Day

What a fun holiday! Now I don't know any weather observers but I certainly know two little boys who would love to do some fun weather related projects!


Click here to go to learn how to make this handprint sun!

Thursday May 5th - National Day of Prayer and Cinco de Mayo

I am joining our other members of our community to pray for our town, our state and our nation on this day. I love the idea of a National Day of Prayer. As for a craft idea I am sure I will think of something.

As far as Cinco de Mayo, usually we go eat Mexican food but this year I think we will stay home and make our own feast. Maybe see if I can master my families enchilada recipe. I am the only one who can't make them successfully. I will post any tips that come up!

Friday May 6th - Space Day

Here's a link to a fun webpage made just for today!

Saturday May 7th - Join Hands Day and National Scrapbook Day

Join Hands Day is a day to make a difference in your community through helpful projects that connect youths and adults. It is an opportunity to reach out through volunteer organizations and to connect generations and develop new relationships.

National Scrapbook Day! What a great holiday to get together with your friends and scrapbook! Or at least take the time to put together a fun layout or two!

Sunday May 8th - Mothers Day and No Sock Day

Mothers Day is right aroung the corner. Have you gotten your gifts ready? Planned a special time to be with your Mom? Cards should be mailed soon to those people who you have to mail them to. These are questions that I need to answer early this week but I think we could all use the reminders.

On the other hand. Would your family be relieved if you actually TOLD them what you would like for Mothers Day? Would you be less dissapointed if you actually let them know you would prefer a Jo-Ann's gift card than a bouquet of flowers? My husband and I have struggled with this for years and every time he would ask me what I want I would say "oh anything" or "suprise me" or "if you had been paying attention you would know" and then he would be stressed out and I would be setting myself up for dissapointment. But I have found that being happy with a stress free husband is the BEST gift and not being suprised is NO BIG DEAL! Now I leave a few subtle or not so subtle hints and he and the boys love giving gifts to Momma that they know she loves! The boys still think they are suprising Mom though.

This same theory applies to what I want to do on special days, date nights and all sorts of other things. And yes my husband still suprises me but at least now he has a starting point! Some people may think my way of thinking is selfish but truely it is selfish to demand to be suprised and then not happy with what he picks out!

Monday May 9th - Lost Sock Memorial Day

Okay friends, you had to laugh a little when you read that right? I know I did, and I can think of a few things that would help those socks go out in style! Stay tuned for my Lost Sock Memorial Day post!

Sunday, May 1, 2011

A letter from Jesus!

Dear Friend,

Thank you for attending the service today. I want you to know this made me very happy. Only you and I know the extent of your devotion to me. This letter is not to condemn you in any area you might lack completeness, but to tell you that I love you. I loved you when I gave my life for you. It would be many, many years until you would be born, but I knew you just the same, and I knew you well. I knew, many years ago, about all the things you would like and dislike - all about your temper and your weaknesses - all about the times you would fail, but that made no difference to me. I love you so much I died for you. And, child, I love you just as much today.

I see the good things you do - all of them. I appreciate every time you make an effort to do the right thing, especially when it  seems to you that you are the only one in the world who cares. My love for you knows no bounds, and nothing can stop it. I shall ever be near you. All you need to do is turn my way.

This morning you took the time to thank me. Now I shall do the same. Thank you for every step you take with me in mind. Thank you for all the times you've shown kindness to your fellow man. Thank you for trying to be the best you can be.

Never forget, whether you feel like you're sitting on tip of the world or thought the bottom has dropped out of everything, I love you and I care!!!

With an everlasting love, my precious child
Jesus

***This letter was passed out at our church's Good Friday service. It touched my heart so I thought I would pass it on to you, my friends. I do not know who the author is. If anyone knows, please tell me so I can give proper credit.

Thursday, April 28, 2011

Simple, Easy May Day Baskets!


These little baskets can be used for many many things! I am using them as May Day baskets for my sons teachers, Sunday School teachers and nursery attendants. I need 8 all together and so far have 4 made.

What you need -

1 square sheet of paper, I used a 12x12 piece of cardstock but a 9x9 square piece would work as well.
Paper squares 1/2" smaller than the squares on your paper, mine were 3.5"
Brads
Glue stick

Score and fold your paper into 9 squares, this is easier if you have a paper cutter that has a scoring blade but totally possible if you do it by hand. The lines show you where the paper is folded.


Cut (see the picture, the squiggly lines are where you cut)

Fold each section so that your paper bends nice

Decorate the outside squares, I just used decorative paper but you could get as fancy as you want


Bring up the sides (once again, see photo)


Using a hole punch or a sharp pair of scissors punch a hole through the three squares where they intersect. (I used my crop-a-dile but on the first basket I just used scissors to poke the hole through)

Poke a brad through the three layers plus one side of the handle.


Repeat on the other side.

Line basket with tissue paper, insert a pony pack of flowers and you have a darling May Day basket!

Happy May Day my friends!