Pages

Thursday, March 25, 2010

Easter Wall Hanging with Foamboard Shelf!


This is my project for Living With Lindsay's $5.00 Challenge. Wandering around the $ store I knew exactly what I wanted to make but couldn't find the most critical aspect, the shelf. Finally I went down the office supply aisle and the light dawned!

Here is how I spent my $5.00. 1 piece of foamboard, 2 decorative bunnies, 1 bag of moss, and 1 picture frame. I also used paint, glue, and a scrap piece of paper out of my stash.

First of all I cut a piece of foamboard to replace the cardboard in the frame. This I covered with a piece of scrapbook paper.


Then out of the foam board I cut two rectangles. Just shorter than the inside of the frame and just wide enough for the two bunnies to fit on.


I used hotglue to glue these two pieces of foamboard together. This strengthens your shelf considerably, the hotglue melts the foamboard slightly and melds the two pieces together slightly. 

Meanwhile I had a BIG decision to make, should I leave the bunnies colorful or should I paint them to unify them and make them a little more elegant looking. In the end they got a good coat of Oil Rubbed Bronze Spray Paint. I think it is their pink eyes that sealed their fate. I also painted the frame Oil Rubbed Bronze.

While my precious bunnies were drying I started glueing moss all over my foam "shelf". I know alot of people say to use spray adhesive with their moss projects but I think the moss starts shedding when I used it so I use my trusty glue gun and I know that moss is staying where it needs to stay!

This is the poem I used, and yes I wrote it, I can't believe I am posting that because I never feel comfortable sharing poems or songs that I write. I am pretending it is like a conversation that my two little bunnies are having. There are lots of springtime songs on the internet or you can use this one if you want.

Springtime is here, my dear, my dear,

Springtime has sprung this morning.

Springtime is here, the birdies I hear,

Winter had better take warning.

Springtime is here, warm weather is near,

I feel the sun’s warm rays.

Springtime is here, my heart full of cheer,

To be enjoying springtime days.

Springtime is here, no need to fear,

Springtime has surely sprung.

Springtime is here, we’ve waited a year.

To hear the birdies songs sung.

- Kelly Brumley


Okay nobody thinks I am cheesy now right? Well don't tell me if you do! I printed this poem off on cardstock and inked the edges with a brown inkpad.  I then hotglued it to the paper covered foam board. I think it is time for a little assembling. So I glued the foamboard shelf, now covered with moss) onto the picture frame. I held it in place while it got very sturdy and the glue hardened right up. Then I glued my little bunnies onto the shelf, I also glued their little backsides onto the foamboard in the picture frame so that helps support the shelf and bunnies!


I am so pleased with how this turned out! I am loving it! And it doesn't have to come down right after Easter, it can stay up througout spring. Which is nice since Easter is coming early this year!


Happy Spring!

Wednesday, March 24, 2010

50th Follower Stamp Sets Giveaway

I was so tickled when my "followers" reached 50! It made my day! I have a fun giveaway planned to celebrate! I will be giving away 3 sets of stamps. The first group is a set of 7, the second set is a set of 3, and the third set is a set of 2 spring stamps. These fit perfectly with the projects that I am going to do tutorials on soon.

Here are the different ways to enter: LEAVE ME A SEPERATE COMMENT FOR EACH! Yes, I was shouting, not in a mean way though! Just in a please, please, pretty please way. It makes me sad when I see someone who didn't get the full amount of entries because they only left me one comment when they should have 2 or 3! Get 1 entry for leaving me a comment telling me what your favorite season is. Another entry for becoming a follower of my blog or for being a faithful follower. (Leave a separate entry). And finally give a little shout-out on your blog or blog sidebar for a third entry (leave a separate entry).

Oh and to appease my husband I will clarify two things, 1. If your number is picked twice, you win twice, I trust you will pass along the duplicates or give them away on your blog or line them up like decorative blocks or ya know, something! and 2. Yes honey I will ship these out fast enough that it won't be fall before they get their spring stamps. I am terribly slow but I do TRY!

As for my favorite season, it is FALL! I simply can't help it; to me there is nothing in the world better than snuggling up in a sweater while the rain is pouring outside and the soup is cooking in the crock-pot inside! Preferably I am reading a good book with one of my lovies or all by myself. And another thing I love about fall is the chance of rain days. My hubby works an occupation that if it rains TOO hard he is rained out, hard on the paycheck sometimes but oh so easy on my heart! I love having him come through the door with a flannel on, a big smile on his face, and watching him put his muddy work boots by the side of the door. It warms my heart right up! Our town fair is also in the fall, Mikey's birthday is in the fall and don't get me started about Halloween and Thanksgiving, two of my favorite holidays! I simply love fall. All the other seasons have lovely traits too but fall is the best in my opinion!


So in summary:
*Leave me a comment about your favorite season
*Follow Make It Sparkly Mama
*Give a shout-out about my giveaway

And leave me a comment about each!

Thank you so much for your support and sweet comments! I am lovin' this blogging thing!  The winners will be announced on Monday, March 29th during my first linky party, Making Me Happy Monday!

Monday, March 22, 2010

New Desk Accessories

So I have had these desk organizers for years, they used to be boring oak colored. I don't have before pictures because I was too excited to get painting and couldn't find my camera! I spray painted them matte black and then scuffed them up to look old. Then I glued some scrabble tiles on to spell out "Read" and "File". I almost used Tile letters out of my own Scrabble game but then thought better of it and bought some at a craft store! Maybe if they are pretty than I will be more tempted to actually use them versus just piling things on my desk.


I am thinking of making the second piece into a charging station for the cell phones and such.

Friday, March 19, 2010

Blog Swap with Making The World Cuter!

Today I am blog swapping with Tiffany from Making The World Cuter! I am so excited to have her over here and so excited that this is my first blog swap! She has tons of adorable projects so hop on over there and check her out! Thanks Tiffany for stopping by today!

Hi you cute Sparkly Readers!
So fun to be here over at Kelly's place!

I'm Tiffany, you can call me Tiff.
Here I am with my hot hubby, who makes me smile every day.
Here are my 3 stinkin cute kids that make me happy and crazy all at once, and we are having another this fall.
We live in a fun little town in Southern Oregon, where my hubs is going to school. I take pictures on occasion, and as soon as I am done with this morning sickness, I plan on taking lots more. I have a little photography blog as well. Pumpernickel Buttons.
If you've never been over to Making the World Cuter;
Here's a little glimpse of what goes on...
  • Monday-Making the World Cuter Mondays-a linky party for you to show off all the cute things you have made in the past week
  • Tuesday-Toot Toot Tuesdays-Where I share a new, usually on the cheap, tutorial to make something crafty and fun.
  • Wednesday-WooHoo Wednesdays-Sometimes we'll have giveaways, sometimes a yummy recipe, sometimes a bonus crafty something...always something fun!
  • Thursday-Three things Thursdays-Just a day to share three things that have been going on, or talking about my three "things" or whatever.
  • Friday-Friendly Friday-Your looking at it! Swapping with the fun and cute blogs all over the place and having a blast making new friends! :)
Here are a few of my tutorials that I have shared recently...

Easy towel poncho (it's still cold here, so my son wears it watching movies in his jammies-can't wait for summer!)
Make your own blocks (I love to make these sets up for birthday and baby shower gifts!)


This wreath (using salt dough to make buttons, and just things I had around the house, this wreath was practically free!)
And finally these EASY napkin rings, (these are free, as long as you have a cardboard tube, a hot glue gun and fabric scraps of any kind!)
Thanks so much Kelly!
Thanks for making the world a little sparklier!
Can't wait to see what you come up with next!

Thursday, March 18, 2010

Gentle Reminders.....For the Bathroom!

Have I mentioned that I am Mom to three boys? They are 17, 8, and 18 months. Their bathroom is a busy place. I am constantly reminding them to wash their hands and then reminding them to go do it again using soap! I thought maybe a little visual reminder in the bathroom could cut down on my nagging a little. Thus the soap disperser chalkboard was born! I had a hard time wanting to cut up one of these vinyl chalkboards from the dollar store (after all I only had 2!) and while I was debating I flipped it over and WOW couldn't believe my eyes, there was one on the back too! So really I had 4! Hooray! Making them were so simple, I took the label off of my soap dispenser, probably bought at the dollar store, and laid it on my chalkboard vinyl. Then I peeled it off cut my vinyl out and placed it where the label used to be. I did this for the front and back.


Using chalk I wrote some little reminders for the little (and big) ones to read!


On a side note, the chalk does get wet and wiped off in the bathroom, if you want your notes permanent, you would want to write on them and seal them with a couple of coats of sealer before you place them, I however love that I can change them up whenever I want!

Tuesday, March 16, 2010

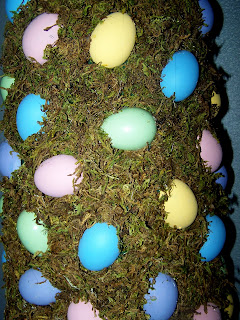
Easter Egg Topiary Tree Inspired by PB


I was laying on the couch DYING  recuperating from strep throat a couple of weeks ago when my Pottery Barn Catalogs came in the mail. My sweet hubby brought them over to me on my deathbed  couch and as I turned through the pages, drooling over all the pretties, these caught my eye BIG TIME!


But even though I was delirious with fever I knew I  would never pay $89.00 for an Easter decoration. I don't pay $89.00 for anything. Cuz I am cheap frugal! However all that couch laying paid off for me because the wheels starting turning on how I could make my own! And if you love it as much as I do I have made up a little tutorial. But first  just for a little comparison - The total cost for this project was around $15.00 and my topiary is 40" tall, Pottery Barn's is only 30" tall for $89.00.

Supply List:

Tomato Cage
Hanging Basket
Newspaper
Glue
Green Paint
Plastic Easter Eggs (the kind that split in half long-wise) I used about 40 whole eggs so 80 halves
Moss (I got mine from the dollar store)
Glue Gun - with lots of hot glue sticks
Craft Paint in Pastel Colors (optional)
Ribbon or Twine


Step 1: Using hotglue, glue your tomato cage upside down on top of your hanging basket pot. The reason to use a hanging basket pot is that it has slits in it for the hangers to go in and they come in very handy to tie your tomato basket to. After the glue has set up. Tie the tomato basket to the planter pot for added stability.


Step 2: Tie the pointy ends of the tomato basket together very tightly and securely.


Step 3: Mix some white glue with water until the thickness is just a little thinner than milk. I use a big dishpan to mix mine in. You only need 1/2" or so in the bottom of your dishpan.

Step 4: Cut your newspaper into strips about 4" wide works well.

Step 5: Get your newspaper strips wet, just one at a time, and then drain the extra water/ glue mixture off. Wrap the wet newspaper around your tomato cage starting from the bottom and working your way up. You will want to make sure you overlap the edge of your planter pot just a little bit because the  newspaper shrinks up as it dries. I used clothespins to help hold the wet newspaper onto the tomato cage. 


Step 6: Let this dry and repeat until you have a nice hard shape. I let mine dry overnight between layers and I put on about 4 layers.

Step 7: After all the layers are dry you will need to paint the entire newspaper form green. This will help you when you are glueing the moss on so that you can't see any newspaper through it.

Step 8: If you are painting your plastic eggs you will want to do that now. I couldn't find any that opened the right way except for these lovely camo ones from the dollar store so I used acrylic craft paint to paint them. I did three coats to make sure they were covered really well.

Step 9: Using hotglue attatch your eggs to your topiary form covering as closely as you want. I didn't space mine as closely as the PB picture.

Step 10: Now it is time to fill all those spaces in with moss. This step takes a while and it takes alot of hotglue! I worked on mine in spurts.

I  am so pleased with how it turned out. It is not a carbon copy but it is so awesome to find something you love and use it as inspiration for a project of your very own. The Pottery Barn picture was just a jumping off point. Something to get me thinking, and I LOVE the results.

Monday, March 15, 2010

A teenage guy present!

Making a present for a teenage boy is HARD! But finally I discovered one that was really liked and coveted by my husband and teenage son, guess what they are getting for Easter? We live here in rural Idaho and my family is into hunting big time, these "Game Bag's" work super after a successful hunt. Enclosed in a cool camo pouch to keep them from getting dirty in a hunting pack. They work up in a jiffy and are practical and cool all at the same time. What more could I ask for? Here are some pictures, I don't do sewing tutorials, the reason is simple, I am just a beginner myself. It would be like my 8 year old giving driving lessons. Yeah, we let him drive the other day and it wasn't pretty. (Just in a huge, completely empty, gravel parking lot, by the way!) But I will show some pictures and do a little explaining as I go.

Here they are, 4 bags and the case

To Make the Bags you just make a pillowcase out of fabric only larger. About twice the width of a pillow case and 1 1/2 times the length. To make the case I used 1 yard of camo fabric, folded it in half and sewed up the sides, right sides together. I turned it inside out and topstiched the remaining side. Then I folded it up onto itself and topstiched down the sides. So easy! Added a piece of velcro and  I was done!

 I used one half of a king sized topsheet for these. The fabric is the perfect weight. Trust me these are way better than the ones you see at most sporting good stores, I know because my husband and I used to own an Archery Shop and I saw what is available. I double sewed each and every seam in the bags themselves, to make them tougher.


HAPPY BIRTHDAY JOSH! May this next fall bring you lots of hunting sucesss!

Sunday, March 14, 2010

2 Cute 2 Pinch!

Nobody had better be pinching my baby boy this Wednesday! He is all ready for the festive time and will be sporting his new shirt which has 2 CUTE 2 PINCH appliqued on it. I started out with this $1.00 shirt from Wal-mart it is a size 3T so hopefully will fit next year as well. As you can see from the photos it is a little big but he wears it well.


This is the shirt beforehand, I ironed green fabric onto fusible webbing and cut out the letters with my cricut. A couple of tips for cutting fabric with your Cricut, use a deep blade depth and a medium speed. Make sure that your Mat is brand new or almost new so the fabric and the fusible webbing stick really well. It also helps to have a sharp blade.


I stitched around the letters with my sewing machine in white thread to secure them to the shirt and to give the letters some contrast. It was pretty hard to see where the fabric was at on the shirt which made the appliquing a bit challenging. Next time I will use fabrics that contrast more. Please ignore the spots on the shirt in the below photo, Mikey wore this to church and to Chinese Food afterwards. He is NOT the tidiest eater!


Oh and he thinks the stitching itches his tummy so I put a onesie on him underneath the shirt for today but I plan to line the shirt with some scrap t-shirt material. These aren't the bestest pictures but we were already running late for Sunny School (Sunday School) with daylight savings time and all. And as you can see we still had socks and shoes to put on and to comb that wild, wild hair! So I just snapped a couple and called it good!


Happy St. Patricks Day!

Monday, March 8, 2010

My Sweeter than Chocolate Bunny!

While thrifting a few days back I found this very ordinary looking glass bunny for 99cents. I am a little low on Easter decorations so I put him in my cart. After a little paint I think he turned out pretty cute!


I spray painted him Espresso, applied a Crackle Medium and some white paint. So quick and so easy. A couple of points if you have not worked with a Crackle Medium before. You can use spray paint for the base but not for the overcoat. So I was fine in using brown spray paint underneath but it wouldn't have worked if I used white spray paint after the Crackle Medium. Another thing, sometimes people tend to rush the top step (just to see if the stuff works) well don't! It says to let dry so let it dry! And don't overbrush it, just brush your topcoat on and leave it alone. I have learned this the hard way! I let it set about 45 minutes with good results.

The whitish paint I used was Light Ivory by Americana, I use it all the time and buy tons of it. It is so close to white but it's not! LOVE IT!

I am still having a hard time believing it is spring even though the weather here is exceptionally gorgeous! Oh and here is the bunny before his transformation.